Printable Knitting Needle Size Chart All Knitters Should Own
Knitting Needle Size Chart You Can Print Right Now
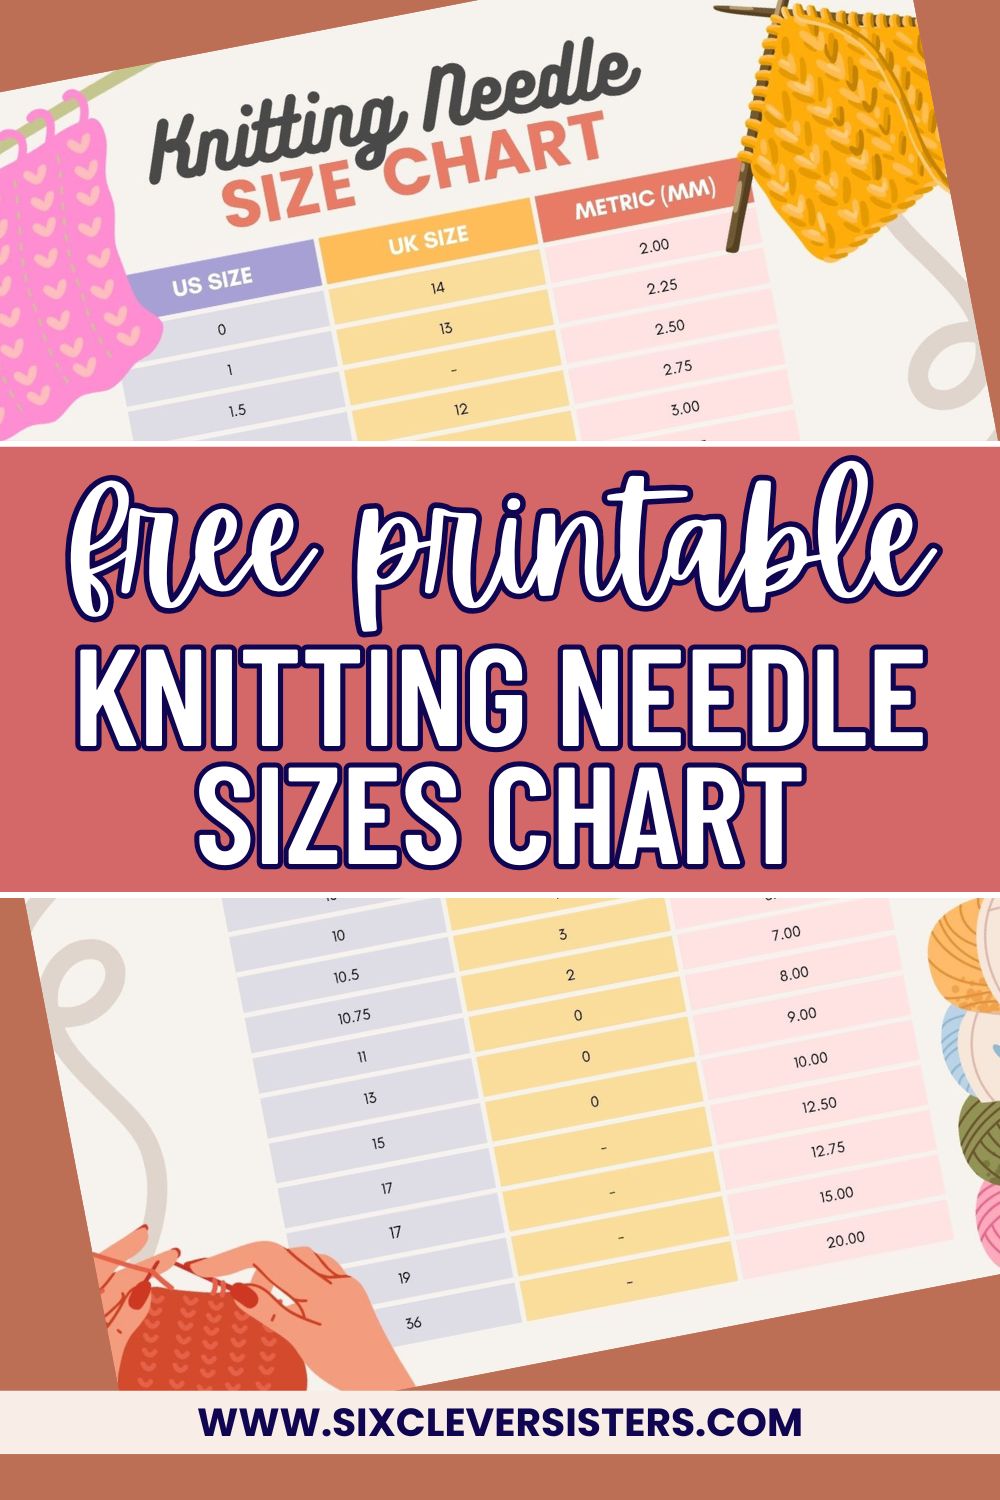
Wrong needle = ruined project. This chart shows every US, UK, and metric size on one page so you stop second-guessing and start knitting.
You’re three rows into a gorgeous sweater pattern when you realize the knitting needle size makes zero sense.
The pattern calls for 4mm needles, but your set only shows US sizes. Or worse, you inherited a collection of vintage needles with UK sizing that might as well be written in code. You’re stuck Googling conversions on your phone with yarn-covered fingers, losing momentum on a project you were excited about five minutes ago.
This happens to every knitter, whether you’re working from international knitting patterns, shopping online, or trying to make sense of older needles passed down from your grandmother. The three major sizing systems in the United States, United Kingdom, and the metric system don’t align in any logical way, and a single wrong guess can throw off your gauge entirely.
That’s exactly why you need a knitting needle conversion chart within arm’s reach of your favorite chair.
Why Knitting Needle Sizes Are So Confusing
Needle sizing should be simple, but it’s anything but.
The knitting world operates on three completely different measurement systems, and none of them talk to each other. US needle sizes use arbitrary numbers that skip around (why does size 1 jump to size 2, then suddenly we’re at size 10.5?). UK size runs on its own numbered scale that decreases as needles get larger. Metric sizes use millimeters, which sounds straightforward until you realize most American knitters have never memorized needle diameters in millimeters.
This matters more than you’d think. Using a needle even half a size off can wreck your gauge, which means your finished sweater might end up two inches too small or your hat won’t fit. Knitting patterns written in different countries assume you know the conversions, and yarn labels often list the recommended needle size in only one system. If you’re buying needles online from international sellers, you need to decode the sizing before you click purchase, or you’ll end up with needles you can’t use.
The confusion multiplies when you factor in older needles, which might use outdated UK sizing standards, or specialty needles like circular knitting needles and double-points that sometimes label different sizes differently than straight needles. Without a reliable handy chart, you’re either guessing or wasting time hunting down conversions every single time you start new projects. A printed size chart eliminates all of that and turns needle selection into a two-second glance instead of a research project.
Complete Knitting Needle Size Conversion Chart
Here’s the chart you actually need, covering every standard size across all three systems.
We This table includes US size, UK size, and metric measurements in millimeters. Print this once, laminate it if you’re serious, and keep it in your knitting bag or taped inside your craft room cabinet. You’ll never second-guess the size of the needle again.

Click here to print the FREE and CUTE printable knitting needle size chart!
Notice how UK needles run backward compared to US needle sizes. A US size 8 is a UK size 5, and the gap widens as you move up. Metric needle sizes are the most consistent because they’re based on actual diameter, but most American patterns don’t use them. If you’re ever unsure which system your pattern uses, check the yarn label or the pattern introduction. International designers usually clarify, but old patterns sometimes assume you know.
{One critical note: some needle manufacturers round metric sizes slightly differently, so a 4.0mm needle from one brand might be labeled as a US 6 while another brand calls it between a 5 and a 6. When precision matters (like for gauge-sensitive garments), always measure your gauge swatch rather than trusting the needle label alone.}
How to Use This Free Printable Chart for Every Knitting Project
Once you’ve printed your chart, here’s how to put it to work immediately.
Matching Pattern Requirements to Your Needles
When a pattern specifies a knitting needle size, find it on the chart and cross-reference all three systems. If your pattern says “4mm needles” and all you own are US-sized needles, the chart shows you need a US 6. If you’re working with a vintage UK pattern calling for size 8 needles, you’re looking for a US 5 or 3.75mm. This prevents the guessing game that leads to buying duplicate needles or starting knitting projects with the wrong size.
Buying Needles Online or Internationally
European and Asian shops often list needles only in metric. Japanese patterns almost always use metric sizing. Before you add to cart, check the chart to confirm what you’re actually ordering. A 2.75mm needle is a US 2, which is tiny. If you meant to buy needles for a worsted-weight sweater and you’re looking at 2.75mm, you’ve made a mistake. The chart catches those errors before you spend money.
Identifying Mystery Needles
Thrift store finds, inherited needle sets, and unlabeled needles are common in knitting. If the size wore off or was never marked, you can use a needle gauge tool (a small plastic card with holes) to measure the diameter in millimeters, then check the chart to find the US and UK equivalents. This turns a pile of random needles into a usable, organized collection.
Adjusting for Gauge When Swapping Needle Sizes
If your gauge swatch comes out too tight, you’ll need to go up a needle size. If it’s too loose, go down. The chart helps you move precisely. Going from a US 7 to a US 8 increases diameter by 0.5mm. That’s often enough to fix minor gauge issues without overshooting. Small adjustments in needle size create bigger changes in fabric than most knitters expect, so use the chart to make incremental shifts rather than jumping two or three sizes at once.
What to Know About Needle Size and Yarn Weight
Not all size knitting needles work with all yarn sizes, and the chart doesn’t tell you that part.
Yarn weight (weight lace, fingering, sport, worsted, bulky, etc.) dictates which knitting needle size will give you a usable fabric. If you use a US 15 needle with fingering-weight yarn, you’ll end up with a fabric so loose it won’t hold its shape. If you use a US 2 needle with bulky yarn, your hands will cramp and the fabric will be stiff as cardboard.
Here’s a quick reference for pairing yarn weights with needle sizes:
- Lace weight: US 0 to US 3 (2.0mm to 3.25mm)
- Fingering weight: US 1 to US 4 (2.25mm to 3.5mm)
- Sport weight: US 3 to US 5 (3.25mm to 3.75mm)
- DK weight: US 4 to US 6 (3.5mm to 4.0mm)
- Worsted weight: US 7 to US 9 (4.5mm to 5.5mm)
- Bulky weight: US 10 to US 11 (6.0mm to 8.0mm)
- Super bulky: US 13 to US 17 (9.0mm to 12.75mm)
- Jumbo yarn: US 19 and larger (15.0mm and up)
These ranges are guidelines, not laws. Some knitters prefer a tighter or looser fabric depending on the project. Shawls often use larger needle than the yarn label recommends to create drape. Amigurumi and stuffed toys use smaller needles to prevent stuffing from showing through. Always check your pattern’s recommended needle size first, then use the chart to convert it and the yarn weight guide to confirm it makes sense.
Common Needle Size Mistakes and How to Avoid Them
Even experienced knitters mess up needle sizing, and most mistakes are fixable if you catch them early.
Assuming all brands use identical sizing standards. A US 8 needle from one manufacturer might measure 5.0mm exactly, while another brand’s US 8 might be closer to 4.75mm or 5.25mm. This variance is small but enough to affect gauge. If you’re switching needle brands mid-project or buying a replacement needle, measure the diameter of the needles with calipers or a gauge tool to confirm they match.
Ignoring cable length on circular needles. The needle size is only part of the equation. A 16-inch circular in US 7 works for hats, but you can’t knit a sweater body with it. Cable length matters as much as needle diameter, and the chart won’t help you there. Always check both the needle size and the cable length before starting a project.
Mixing up UK and US sizing. This happens constantly because both systems use plain numbers without units. A pattern that says “size 8 needles” could mean US 8 (5.0mm) or UK 8 (3.75mm), which is a massive difference. If the pattern doesn’t specify, look at the yarn weight recommendation and the designer’s location. UK designers usually mean UK sizing, and US designers default to US sizing, but always double-check.
Not swatching because you trust the yarn label. Yarn labels suggest needle sizes, but your personal knitting tension might require something different. The only way to know your true gauge is to knit a swatch with the actual yarn and needles you plan to use. The chart helps you pick the starting point, but your hands are the final judge. If your gauge swatch is off, use the chart to adjust up or down by a single size and swatch again.
Using needles that are too short for the cast-on. This isn’t about diameter, but it trips up knitters constantly. A 24-inch circular needle can’t hold a cast-on of 200 stitches for a blanket. You’ll run out of cable space and your stitches will be too tight to work. Check your pattern’s number of stitches and make sure your needle length can accommodate it. The size chart shows diameter, so keep a separate note of which cable lengths you own.
How to Organize and Label Your Needle Collection
A printed chart is only useful if your needles are also organized.
Unlabeled needles are the enemy of efficient knitting. If you have to stop mid-project to figure out the size of your needle, you’re wasting time and risking mistakes. Here’s how to fix that.
Label every needle as soon as you buy it. Use a label maker, a permanent marker, or waterproof stickers to mark both the US size and metric measurement on each needle. For circular needles, mark the cable or the join where the cable meets the needle tip. For double-pointed needles, mark every single needle in the set because they get separated constantly.
Store needles by size, not by type. Keep all your US 7 needles together regardless of whether they’re straight needles, circular, or double-pointed. This makes it easy to grab the right needle size without digging through multiple containers. Clear zippered pouches or a binder with labeled pockets work better than tossing everything into a drawer.
Keep your printed chart in the same location as your needles. Tape it inside your storage cabinet, clip it to your knitting bag, or laminate it and attach it to your needle case. If you have to search for the chart every time you need it, you won’t use it. The point is instant reference, not another step in your process.
Use a needle gauge tool for mystery needles. These small plastic cards have precision-cut holes for every needle size. Slide your needle through the holes until you find a snug fit, and the card tells you the exact metric size. Then check your chart to find the US and UK equivalents. Needle gauges cost a few dollars and solve the mystery needle problem permanently.
Printing and Customizing Your Needle Size Chart
The chart above is ready to print, but you can customize it to fit your specific needs.
Print it on cardstock for durability, or laminate it if you’re keeping it in your knitting bag. Standard printer paper works fine if you’re taping it inside a cabinet or notebook. Use landscape orientation so the table fits on a single page without shrinking the text.
If you only knit with certain needle sizes, highlight those rows on your printed chart with a marker. Most knitters stick to US 4 through US 11 (3.5mm to 8.0mm) for the majority of knitting projects. If you never work with lace-weight yarn, you probably don’t need to reference US 0 through US 3. If you’re a bulky yarn devotee, highlight US 10 and up.
You can also add your own notes directly on the chart. Write which needle brands you own in each size, or note which sizes you still need to buy. Some knitters add a fourth column for notes like “best for socks” or “use for baby blankets” next to the sizes they reach for most often.
For digital convenience, save the chart as a photo on your phone. Take a screenshot or snap a picture of your printed version, then keep it in a dedicated folder for knitting references. This gives you instant access when you’re shopping for yarn or browsing patterns online without needing to carry the physical chart.
How Needle Size Affects Finished Fabric
The needle size you choose changes more than just gauge.
Smaller needles create tighter stitches, which makes a denser, stiffer fabric with less drape. This is ideal for structured projects like bags, mittens, or items that need to hold their shape. Larger needles create looser stitches, which makes a softer, more flexible fabric with more drape. This works well for shawls, scarves, and garments where flow and movement matter.
Fabric density also affects warmth and breathability. A tightly knit sweater on small needles traps more air and provides more insulation, but it’s also heavier and less breathable. A loosely knit sweater on large needles is lighter and more breathable, but it won’t keep you as warm. If you’re knitting a winter hat, going down a needle size from the pattern recommendation might give you extra warmth. If you’re knitting a summer cardigan, going up a size creates a lighter, airier fabric.
Texture changes with needle size too. Cables and textured stitches look more defined on smaller needles because the stitches sit tighter together. Gauge lace patterns open up more dramatically on larger needles because the yarn-overs and decreases have more room to stretch. If your lace shawl looks cramped and the eyelets aren’t showing, you might need to go up a needle size even if your knitting gauge is technically correct.
Finally, needle size impacts how long a project takes. Larger needles work up faster because each stitch is bigger and you need fewer rows to cover the same area. If you’re knitting a blanket, moving from US 8 to US 10 needles can shave hours off the project. Just make sure the fabric still looks and feels the way you want, because speed means nothing if the finished piece doesn’t work.
When to Deviate From Recommended Needle Sizes
Patterns give you a starting point, not an unbreakable rule.
Sometimes the recommended needle size just won’t work for you. If you’re a tight knitter (your stitches naturally sit closer together), you’ll need to use a larger needle than the pattern suggests to hit the correct gauge. If you’re a loose knitter (your stitches have more space between them), you’ll need a smaller needle. This is why gauge swatches exist. Your knitting tension is unique, and the needle size that works for the pattern designer might not work for you.
You should also deviate when you’re intentionally modifying the fabric. Want a denser, warmer hat? Go down a needle size. Want a lacier, more open scarf? Go up a size or two. The pattern’s recommended needle size is based on the designer’s vision for the finished fabric, but you’re allowed to want something different.
Fiber content matters too. Slippery yarns like silk or bamboo create looser stitches, so you might need to drop a needle size to compensate. Sticky yarns like wool or alpaca grip each other more, so you might need to go up a size to prevent overly stiff fabric. The chart helps you make these adjustments precisely instead of guessing.
One warning: if your gauge is off by more than half an inch per four inches, the finished garment won’t fit correctly no matter how carefully you follow the pattern. Don’t skip the gauge swatch just because you’re eager to start. Use the needle size chart to make your adjustments, knit another swatch, and confirm your gauge before you cast on the actual project. Those 20 minutes of swatching will save you from ripping out hours of work later.
Additional Resources for Needle Size Questions
The chart covers the basics, but some situations need more detailed guidance.
If you’re working with unusual yarn (handspun, art yarn, or blends with unconventional fiber content), the standard needle size recommendations might not apply. Ravelry’s yarn database includes thousands of user-submitted gauge reports that show which needle sizes real knitters used with specific yarns. Search for your yarn, check the “projects” tab, and see what needle sizes produced the best results for others.
For vintage patterns, especially those from the UK printed before the 1970s, needle sizing standards were different. A “size 10” needle in a 1950s UK pattern doesn’t match a modern UK size 10. If you’re working from an old knitting pattern, cross-reference with a historical needle conversion chart (available free from several knitting museums and historical societies online) or swatch extensively to find the right modern equivalent for older patterns.
If you’re designing your own patterns, use the chart in reverse. Decide what fabric you want (dense, drapey, textured, etc.), pick the yarn weight, and then swatch with multiple needle sizes to see which creates the fabric you’re imagining. Keep notes on each gauge swatch including the needle size in all three measurement systems, the gauge, and how the fabric feels. Over time, you’ll build your own reference library of what works for your style.
When you’re substituting yarn in an existing pattern, the needle size chart helps you adjust. If the pattern calls for worsted weight on US 8 needles but you want to use DK weight instead, check the chart and drop down to a US 5 or US 6 to compensate for the thinner yarn. Swatch to confirm, but the chart gives you a logical starting point instead of a wild guess.
Knitting and converting needle sizes becomes automatic once you’ve worked with the chart for a few projects. Print it, use it, and watch how quickly those conversions move from confusing to second nature on your knitting journey.
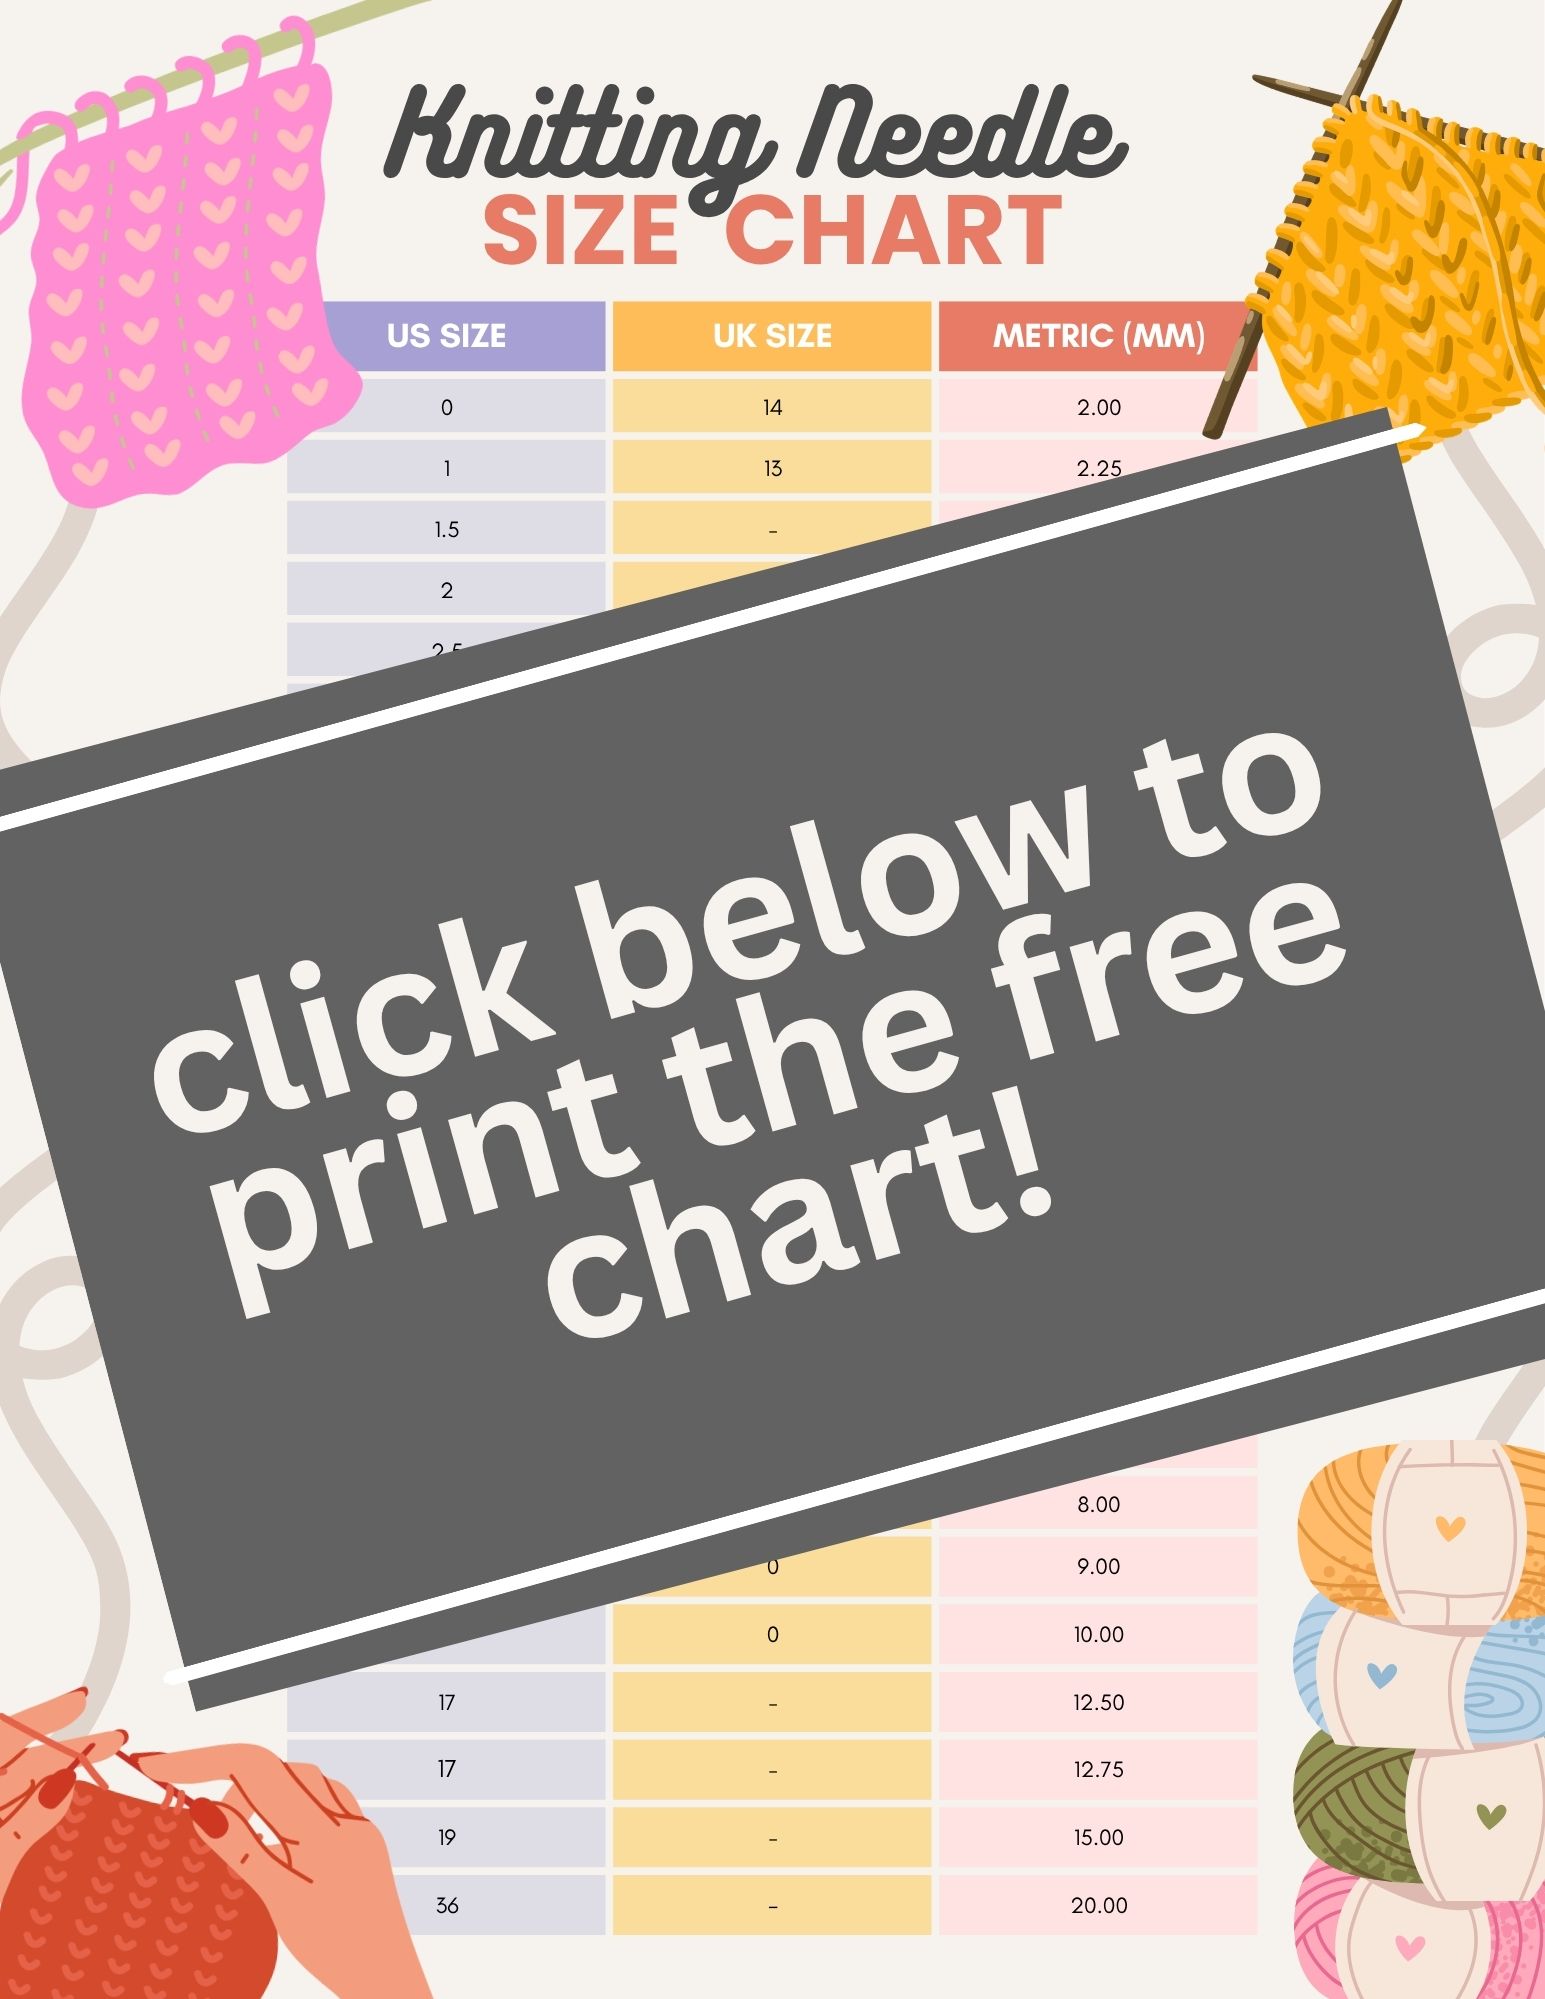
Click here to print the free printable knitting needles sizes chart!