DIY Hello Front Door Sign

DIY Front Door Hello Sign | Wood Sign | Wood Sign Tutorial | Hello Sign | Lettering | How to Make a Wood Sign | Fall | Autumn | Fall Decor | Winter 2019 | Buffalo Plaid | Burlap | Rustic | Farmhouse | Chic | Home | Home Decor | How to | Six Clever Sisters


Front Door Hello Sign

I don’t know about you, but I LOVE a pretty front door. There’s something about it that is so welcoming and inviting, and it makes a house feel like a home right from the first close view. 

Quite a while back, I made a big change to our front door, and turned it from a dark burgundy color to light coral…. it’s a change I have never regretted! My husband and I love what it did to the front of our home. If you need a mini makeover at your house, check out this post…..


DIY Front Door Hello Sign | Wood Sign | Wood Sign Tutorial | Hello Sign | Lettering | How to Make a Wood Sign | Fall | Autumn | Fall Decor | Winter 2019 | Buffalo Plaid | Burlap | Rustic | Farmhouse | Chic | Home | Home Decor | How to | Six Clever Sisters


Front Door Hello Sign

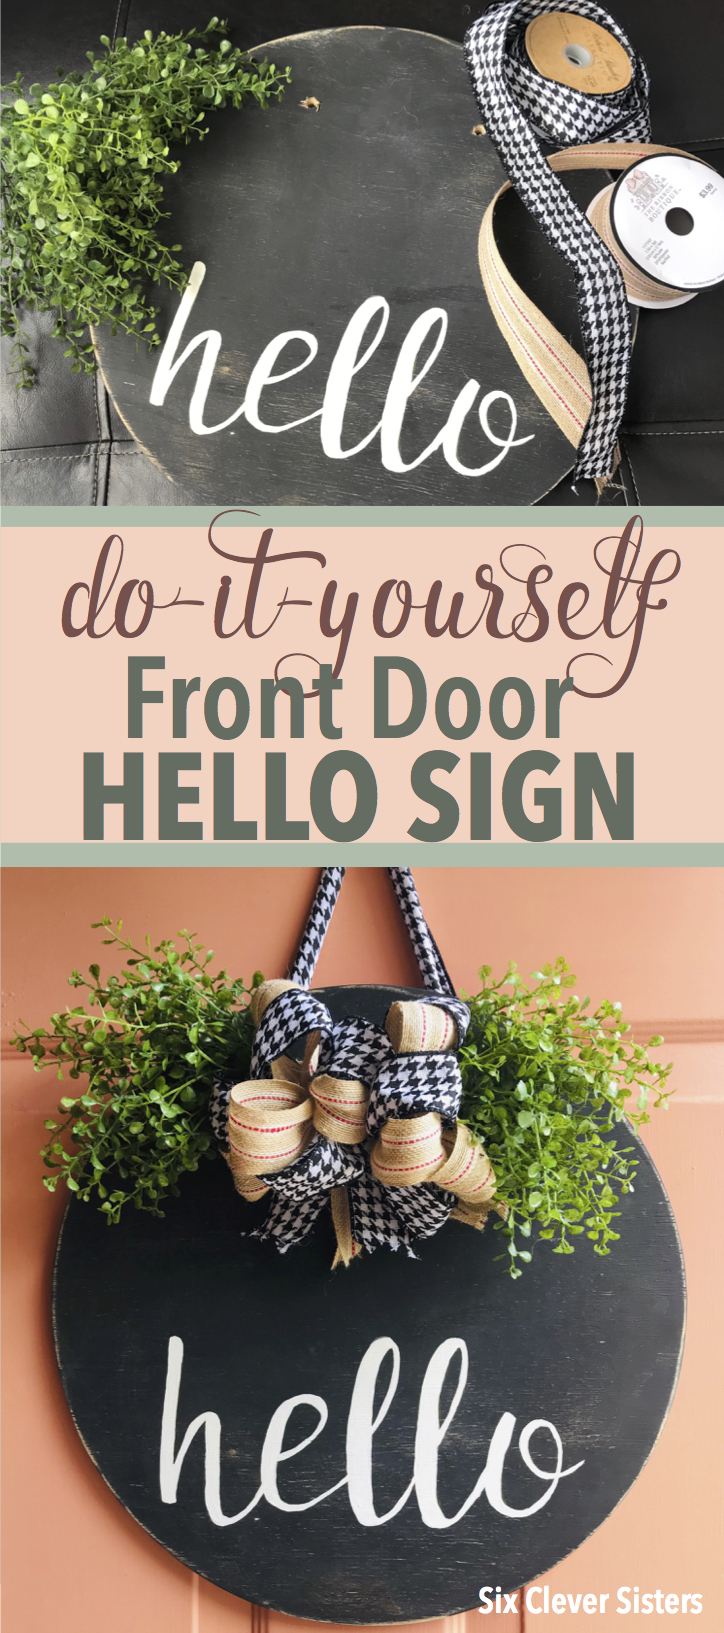
We all love these round wood signs we see on IG and Etsy, right?!? So do I, but I sure don’t want to dish out $40-50 for one. This Front Door Hello Sign is an extremely easy craft that even ‘non-crafters’ can do! And mine cost less than $15. 😉 Keep reading for a basic tutorial. I’m even going to provide you a printable ‘stencil’ for the HELLO!


DIY Front Door Hello Sign | Wood Sign | Wood Sign Tutorial | Hello Sign | Lettering | How to Make a Wood Sign | Fall | Autumn | Fall Decor | Winter 2019 | Buffalo Plaid | Burlap | Rustic | Farmhouse | Chic | Home | Home Decor | How to | Six Clever Sisters


Here’s the list of supplies you will need for the Front Door Hello Sign:

  • 16″ wood circle (my husband has a router, so he could easily cut one for me, but you can find them already cut here)
  • black and cream acrylic craft paint
  • foam brush
  • mini sander
  • drill
  • printable stencil {{ LINK IS BELOW }} and colored pencil
  • small angle paint brush
  • craft or floral ribbon (I used 3 yds of 2 different 1 1/4″ ribbons from Hobby Lobby)
  • small bunch of greenery (mine is from Hobby Lobby)
  • hot glue gun and glue


First cut that 16″ wood circle.

DIY Front Door Hello Sign | Wood Sign | Wood Sign Tutorial | Hello Sign | Lettering | How to Make a Wood Sign | Fall | Autumn | Fall Decor | Winter 2019 | Buffalo Plaid | Burlap | Rustic | Farmhouse | Chic | Home | Home Decor | How to | Six Clever Sisters


Paint the circle black, let it dry, and sand it all over, sanding a little extra along the edges to give it a rustic look. 

DIY Front Door Hello Sign | Wood Sign | Wood Sign Tutorial | Hello Sign | Lettering | How to Make a Wood Sign | Fall | Autumn | Fall Decor | Winter 2019 | Buffalo Plaid | Burlap | Rustic | Farmhouse | Chic | Home | Home Decor | How to | Six Clever Sisters


Now, you are ready to letter. HERE you can download and print the hello stencil. You will need to print it, then cut out the black printed letters to create a stencil. 

DIY Front Door Hello Sign | Wood Sign | Wood Sign Tutorial | Hello Sign | Lettering | How to Make a Wood Sign | Fall | Autumn | Fall Decor | Winter 2019 | Buffalo Plaid | Burlap | Rustic | Farmhouse | Chic | Home | Home Decor | How to | Six Clever Sisters


Get the stencil into position, centered in the lower half of the circle, and lightly draw on the hello with a colored pencil.

DIY Front Door Hello Sign | Wood Sign | Wood Sign Tutorial | Hello Sign | Lettering | How to Make a Wood Sign | Fall | Autumn | Fall Decor | Winter 2019 | Buffalo Plaid | Burlap | Rustic | Farmhouse | Chic | Home | Home Decor | How to | Six Clever Sisters


Using the small angled brush and cream acrylic paint, paint in the letters. You will need to do at least 3 coats. 

DIY Front Door Hello Sign | Wood Sign | Wood Sign Tutorial | Hello Sign | Lettering | How to Make a Wood Sign | Fall | Autumn | Fall Decor | Winter 2019 | Buffalo Plaid | Burlap | Rustic | Farmhouse | Chic | Home | Home Decor | How to | Six Clever Sisters


Once your painting is complete, drill 2 holes about 6″ apart in the upper part of the circle as shown. This will allow you to knot a ribbon through for hanging. 

DIY Front Door Hello Sign | Wood Sign | Wood Sign Tutorial | Hello Sign | Lettering | How to Make a Wood Sign | Fall | Autumn | Fall Decor | Winter 2019 | Buffalo Plaid | Burlap | Rustic | Farmhouse | Chic | Home | Home Decor | How to | Six Clever Sisters


DIY Front Door Hello Sign | Wood Sign | Wood Sign Tutorial | Hello Sign | Lettering | How to Make a Wood Sign | Fall | Autumn | Fall Decor | Winter 2019 | Buffalo Plaid | Burlap | Rustic | Farmhouse | Chic | Home | Home Decor | How to | Six Clever Sisters

Attach your greenery, (I pulled mine apart into 2 bunches and wried them together before glueing.) 

Make a loopy bow with your ribbon and glue into place on top of the greenery. (You can also make use of the drilled holes for attaching the bow or greenery. I threaded some twine through to help hold it in place.)


DIY Front Door Hello Sign | Wood Sign | Wood Sign Tutorial | Hello Sign | Lettering | How to Make a Wood Sign | Fall | Autumn | Fall Decor | Winter 2019 | Buffalo Plaid | Burlap | Rustic | Farmhouse | Chic | Home | Home Decor | How to | Six Clever Sisters


Go hang it on your door! And enjoy looking at it all season long!

DIY Front Door Hello Sign | Wood Sign | Wood Sign Tutorial | Hello Sign | Lettering | How to Make a Wood Sign | Fall | Autumn | Fall Decor | Winter 2019 | Buffalo Plaid | Burlap | Rustic | Farmhouse | Chic | Home | Home Decor | How to | Six Clever Sisters


DIY Front Door Hello Sign | Wood Sign | Wood Sign Tutorial | Hello Sign | Lettering | How to Make a Wood Sign | Fall | Autumn | Fall Decor | Winter 2019 | Buffalo Plaid | Burlap | Rustic | Farmhouse | Chic | Home | Home Decor | How to | Six Clever Sisters


Some of the links on sixcleversisters.com are affiliate links that pay a commission if a purchase is made. Six Clever Sisters, LLC is a participant in the Amazon Services LLC Associates Program, an affiliate advertising program designed to provide a means for sites to earn advertising fees by advertising and linking to amazon.com.

7 Comments

  1. Pingback: Placa decorativa para parede: dicas +8 ideias para usar na decoração.

  2. Do you put something on the backside of the wood so that it doesn’t bang against, constantly hit the door?

  3. Do you have any problem with the wind blowing it around due to the light weight?

  4. Hi!
    How do you paint without going outside the lines?! LOL
    Would I be able to use my cricut machine and make “hello” stickers to apply?
    Thank you!!

Leave a Comment

Your email address will not be published.

*

This site uses Akismet to reduce spam. Learn how your comment data is processed.