DIY Sharpie Mugs – 7 Do’s & Don’ts!
DIY Sharpie Mugs – 7 Do’s & Don’ts!

DIY Sharpie mugs have been so popular, haven’t they?! I’ve had some people tell me they don’t work, and I’m here to help you through the process so that it WILL work.
It’s not up to chance if it works for one person and not for another. There are SEVERAL factors involved in making a truly permanent DIY Sharpie Mug. By the time you get through this list of Do’s & Don’ts, you’ll know just what to do to make a great one. 😉
Here are 7 tips to remember when making a DIY Sharpie Mug:

This first tip is THE MOST IMPORTANT tip of all, I promise. If you don’t choose the right mug, the rest of the process doesn’t even matter.
This past Christmas, I tested this as I was making several mugs for sisters, sisters-in-law, parents, and grandparents. I had an assortment of mugs, and I tested as I went to figure out the perfect formula for getting the mugs right.

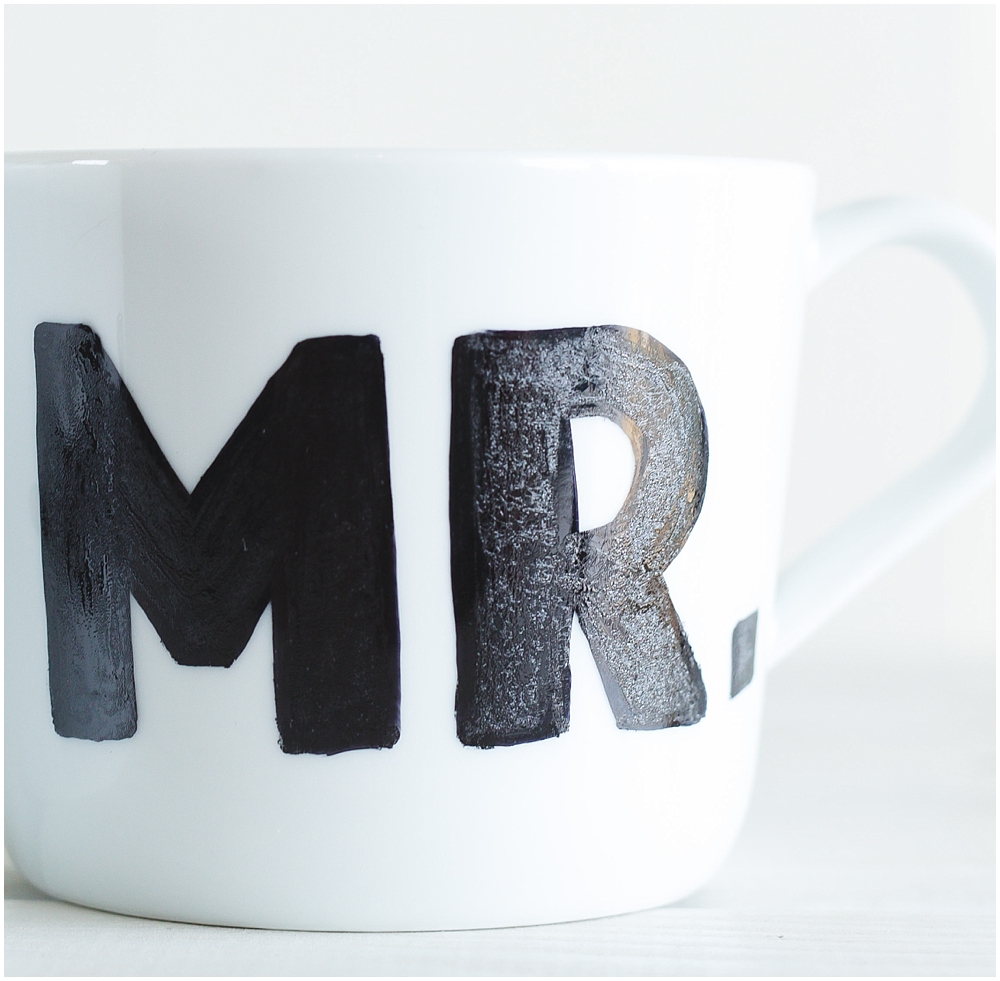
Without a doubt, the mugs that did NOT do well were the very shiny, lots-of-glaze mugs I used. The glaze would bubble up and leave ‘holes’ in my design!

I tried low temps and high temps with the well-glazed mugs — it IS possible to get it to stay on, if you bake at around 200 for a couple of hours, but the paint marker still does a weird bubbly, crackly kind of thing that could be prevented by using a different kind of mug. (see photo below)
So — search for a more ‘matte’ kind of mug that’s not super-shiny, high-glaze. It will definitely work out a lot better for you!

This second tip also is very important — the Sharpie can’t adhere to the glaze on the mug if there is dirt or even just oil from your fingers on it.
You’ll want to be sure you clean it with rubbing alcohol and cotton balls first so it’s completely clean of oil and dirt.

I can tell you from experience that a regular Sharpie, baked or unbaked, will just wash right off the mug.
You HAVE TO use an oil-based paint Sharpie. This will help make your design permanent.


After you’ve designed the mug in oil-based Sharpie, you’ll need to let the design dry for at least 24 hours. I usually let mine dry for a day or two on a shelf just to be sure. 🙂 Don’t bake immediately after drawing your design onto the mug.

After 24 hours, when your design is dry, place your mug into a cold oven, THEN turn the heat on so the mug slowly heats up with the oven.
If you preheat the oven and then put the mug into the preheated oven, your mug could easily crack!


Once you’ve placed the mug into the cold oven, turn the oven to 300 degrees F. and set the timer for 1.5-2 hours.
There’s no exact time for this, because how quickly ovens heat up varies. You’ll want to leave the mug in for at least an hour and a half.
If your oven heats up very quickly, an hour and a half is fine….if your oven takes a while to preheat, give it 2 hours to be safe.
I found in my experience that if the glaze on the mug heats up too quickly, it will bubble up – with your design – and leave weird holes in your design.
(You can see in the photo below that the extra-shiny mug didn’t do well. :-/)
Just stick with a lower temperature….but give it plenty of time so the glaze gets hot enough to bond with the glaze.


Once your mug has baked, just turn the oven off and let the oven and mug cool down.
Letting this happen slowly helps the glaze and Sharpie bond.

Let us see your DIY Sharpie mug project by tagging us on social media! { FB: @sixcleversisters | IG: #sixcleversisters }


Leigh
September 15, 2020Are they microwave and dishwasher safe after baking??
Kristy
December 15, 2020Can you microwave the mug if I use oil based sharpies?
Sandy
January 1, 2021Wish I had found this post before the kids did their painting.
Malissa
February 2, 2021Thanks for sharing the way to do it. I have made it last night and beyond my expectation!
Rachel Barkowski
February 3, 2021Yay!! 👏🏻
Robyn B
June 12, 2021Hi! Thanks for this article. Can’t wait to try it! Wondering if you can bake more than one mug at a time – and if so, does it affect the recommended time/temperature?
Rachel Barkowski
June 12, 2021You can definitely bake more than one mug at a time and the time and temperature stay the same. 👍🏻😀
Brenda
June 19, 2021Will try this today. Thanks!
Dee Fraumeni
June 21, 2021This is a really helpful tutorial thanks Rachel. I just came across it on Pinterest. Thank you for doing all the experimenting for us so that we don’t get disappointed when we give it a try ourselves.
Regards, Dee (Australia).
Rachel Barkowski
June 21, 2021So glad you found it helpful!!
Helen Davies
September 21, 2021I have some blank ceramic circles (3inches in diameter) with a small hole to add a ribbon. I would like to decorate them as ornaments or gift tags. Should I put them directly on the oven racks or on a baking tray?
Rachel Barkowski
September 21, 2021I would use a cookie sheet or baking tray!
Debbie C
October 13, 2021I want to do this with the craft club at school so we will be doing 20. Is it ok to put these on a cookie sheet to bake?
Rachel Barkowski
October 14, 2021Yes! 😀
Steffanie Perry
November 21, 2021Will any colours change intensity when put in the oven, when used on glass? This was my experience with ceramic. Red turned to purple. Perhaps a lower temp for longer?
Rachel Barkowski
November 24, 2021Hi Steffanie, that is a great question! I’ve only used black, white, gold, and silver, and they did not change in intensity. Let me know what happens with red!